Nodes#
Nodes are the key building blocks of a workflow. They perform a range of actions, including:
- Starting the workflow.
- Fetching and sending data.
- Processing and manipulating data.
n8n provides a collection of built-in nodes, as well as the ability to create your own nodes. Refer to:
- Built-in integrations to browse the node library.
- Community nodes for guidance on finding and installing community-created nodes.
- Creating nodes to start building your own nodes.
Add a node to your workflow#
Add a node to an empty workflow#
- Select Add first step. n8n opens the nodes panel, where you can search or browse trigger nodes.
-
Select the trigger you want to use.
Choose the correct app event
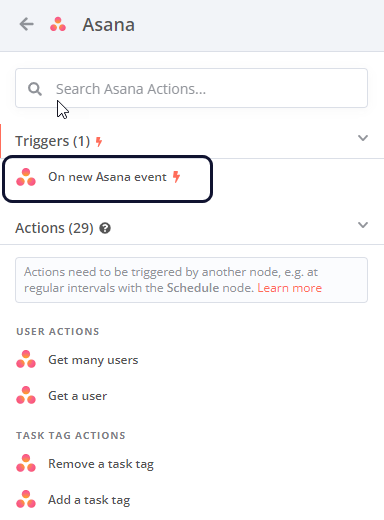
If you select On App Event, n8n shows a list of all the supported services. Use this list to browse n8n's integrations and trigger a workflow in response to an event in your chosen service. Not all integrations have triggers. To see which ones you can use as a trigger, select the node. If a trigger is available, you'll see it at the top of the available operations list.
For example, this is the trigger for Asana:
Add a node to an existing workflow#
Select the Add node  connector. n8n opens the nodes panel, where you can search or browse all nodes.
Node operations: Triggers and Actions#
When you add a node to a workflow, n8n displays a list of available operations. An operation is something a node does, such as getting or sending data.
There are two types of operation:
- Triggers start a workflow in response to specific events or conditions in your services. When you select a Trigger, n8n adds a trigger node to your workflow, with the Trigger operation you chose pre-selected. When you search for a node in n8n, Trigger operations have a bolt icon
 .
. - Actions are operations that represent specific tasks within a workflow, which you can use to manipulate data, perform operations on external systems, and trigger events in other systems as part of your workflows. When you select an Action, n8n adds a node to your workflow, with the Action operation you chose pre-selected.
Node controls#
To view node controls, hover over the node on the canvas:
- Execute step
 : Run the node.
 - Deactivate
 : Deactivate the node.
 - Delete
 : Delete the node.
 - Node context menu
 : Select node actions. Available actions:
- Open node
- Execute step
- Rename node
- Deactivate node
- Pin node
- Copy node
- Duplicate node
- Tidy up workflow
- Convert node to sub-workflow
- Select all
- Clear selection
- Delete node
Node settings#
The node settings under the Settings tab allow you to control node behaviors and add node notes.
When active or set, they do the following:
- Always Output Data: The node returns an empty item even if the node returns no data during execution. Be careful setting this on IF nodes, as it could cause an infinite loop.
- Execute Once: The node executes once, with data from the first item it receives. It doesn't process any extra items.
- Retry On Fail: When an execution fails, the node reruns until it succeeds.
- On Error:
- Stop Workflow: Halts the entire workflow when an error occurs, preventing further node execution.
- Continue: Proceeds to the next node despite the error, using the last valid data.
- Continue (using error output): Continues workflow execution, passing error information to the next node for potential handling.
- Custom Telemetry Tags: Add custom key-value pairs to a node's OpenTelemetry span. Keys are plain text, values support expressions, and this setting only appears when you enable OpenTelemetry tracing. Refer to Add custom attributes to node spans for details.
You can document your workflow using node notes:
- Notes: Note to save with the node.
- Display note in flow: If active, n8n displays the note in the workflow as a subtitle.